How to Draw With Survey Coordinates in Autocad
Entering Survey Data using AutoCAD
Introduction
These techniques apply to basic CAD programs such as AutoCAD, IntelliCAD, etc. If you have a civil/survey program or add-on, such as Land Desktop, SurvCADD, Eagle Point, etc., then there are built-in tools for entering lines and curves.
Lines and tangent curves
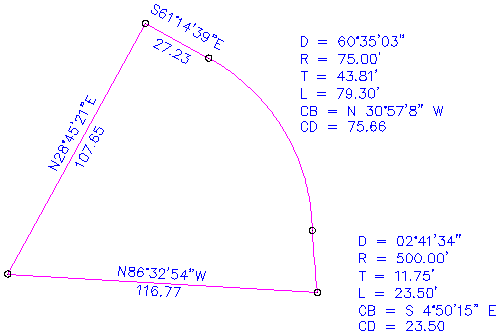
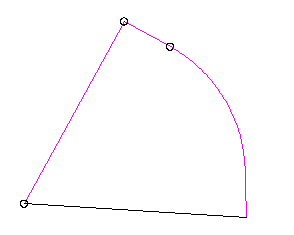
Let's say you have a paper plot or a legal description of a closed boundary. Let's work our way around it. Below is an example of what you might have. Start with a line segment if there is one. Let's start in the lower left (or most southwesterly) corner and work clockwise for this example.

For each line segment, a bearing and distance is given.
Start the ._LINE command and pick a starting point. If you have XY or Northing and Easting coordinates, you can enter them, otherwise just pick any point in the drawing. Then at the next prompt enter @107.65<N28D45'21"E.
Now stay in the line command and draw the next segment. Enter @27.23<S61D14'39"E
Now end the ._LINE command because you need to draw a curve next. We will assume that this curve is tangent to the previous segment (we'll cover non-tangent curves later).
Draw a line perpendicular to the previous segment towards the inside of the curve. Make this line the same length as the radius of the curve. You can use the ._LENGTHEN command to set the exact length. The opposite endpoint is the center point for the next curve. The image below is how it should look now (the green line is the new one).

Now rotate this line, using the opposite endpoint as the radius point. Since this curve is to the right, rotate the line clockwise (meaning you will have to enter a negative angle) the amount of the delta of the curve. -6035'03" in this case.

Now you have the three points needed to draw the ARC. See the picture below.

Start the ._ARC command, enter "C" for center point and pick the endpoint of the line that represents the center point. Next pick the other endpoint of the line, that is the startpoint of the ARC. Next pick the endpoint of the previous line segment. Your curve is complete.
Now we have another curve to draw. This curve is also tangent, but in this case the previous entity is a curve. If the second curve goes in the same direction, it's called a compound curve, if the second curve goes in the opposite direction, it's called a reverse curve.
Notice that this curve is to the left, not the right, so this is a reverse curve. We need to do the same as above to find the center point, except rather than draw a perpendicular line, we need to draw a radial line from the previous curve.
In this case we already have the green line in place, so extend it out past the last curve a bit. Now trim off the part that is inside the previous curve. It should look like this now.

Now use the ._LENGTHEN command to make this line 500 foot long (the radius of this curve). The other end is the center point for the next curve.
Now rotate this line the amount of the delta, just like before. Because this curve is to the left, the rotation angle will be positive, not negative. Now it should look like the picture below (the radius point is not shown since it is so far away).

Now you have your three points from which you can construct the arc.
The last line segment is constructed just like the first two. Start the ._LINE command and pick the endpoint of the last arc, then enter @116.77<N86D32'54"W

Non-Tangent curves
The orientation of tangent curves is determined by the previous entity, but for non-tangent curves you need to know how the curve is oriented. This is the case for non-tangent curves in the middle of a figure or if you want to start your figure with a curve. You can use either the Chord Bearing and Chord Distance or you can use the Radial Bearing.
Chord Bearing and Chord Distance
The Chord Bearing is the bearing from the start point of the curve to the end point of the curve.
Going back to the first curve in the figure above, we can see that the Chord Bearing is N30D57'08"W. However, take a look at the figure. Is the other end of this curve really in the NW direction? No. This is something else you may run into. Depending on the direction you are traversing a figure, you may need to reverse bearings by 180 degrees.
Remember, the Chord Bearing is the bearing from the start point to the end point so in this case, the Chord Bearing is in the SE direction, not NE. So just replace the NE with SW. The actual Chord Bearing is S30D57'08"E.

So now, draw a line that represents this Chord Bearing, using the same syntax as above. The string you will use is @75.66<S30D57'08"E.

After you have this line, you can draw the curve. Start the ._ARC command and select the start point, then choose the "E" option and pick the end point, then use the "R" option and enter the radius. If the curve is opposite of what you expect, select the start and end points in the opposite order.

Use this same technique for non-tangent curves.
Radial Bearing
The Radial Bearing is the bearing from the start point of the curve to the radius point of the curve.
If you are given a radial bearing, you can use this to lay out a non-tangent curve also. This line will run from the last endpoint to the center point of the next curve. In our original example, the radial bearing is not given but it is S28d45'21W. So start the ._LINE command and use the string @75.00<S28D45'21"W. It should look like this.

This should look familier. From this point on, you can follow the same steps as above when you constructed the perpendicular line and rotated it.
Summary
Using most CAD programs including vanilla AutoCAD, you can enter survey data from a drawing or deed without needing any special tools or add-ons. However, if entering this type of data is a frequent occurance, you may consider upgrading to a program that includes faster methods for this type of data entry.
Top of page
Donate to CADTutor
If you found this tutorial useful, you might like to consider making a donation. All content on this site is provided free of charge and we hope to keep it that way. However, running a site like CADTutor does cost money and you can help to improve the service and to guarantee its future by donating a small amount. We guess that you probably wouldn't miss $5.00 but it would make all the difference to us.
Source: https://www.cadtutor.net/tutorials/autocad/survey-data.php
0 Response to "How to Draw With Survey Coordinates in Autocad"
Post a Comment